We use essential cookies to make our site work. With your consent, we may also use non-essential cookies to improve user experience and analyze website traffic. By clicking “Accept,” you agree to our website's cookie use as described in our Cookie Policy.
“String Fuel – Cleaner and Lubricant” has been added to your cart. View cart
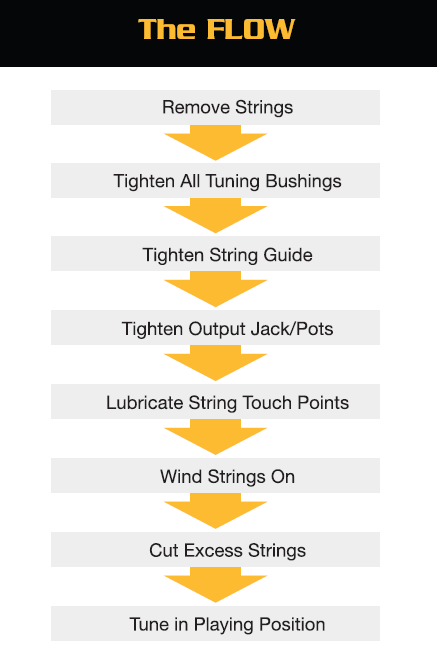
The Complete Guide To Changing Your Guitar Strings
Table of Contents
Every guitarist knows the feeling: you pick up your instrument, start playing and the once-bright chime has turned into a dull thud. Your strings feel grimy, tuning becomes a constant battle, and gliding across the fretboard now feels slow and rough. Changing strings is the single most effective way to restore your guitar’s tone and playability, but some players avoid it in fear of damaging their instrument or ruining their perfectly dialed-in setup.
Whether you are a beginner intimidated by stubborn bridge pins or a seasoned pro looking to speed up your workflow, mastering the string change is easy with the right method and a few time-saving tools. It’s also an important opportunity to inspect your instrument, clean the hard-to-reach spots on the fingerboard and body, and ensure your gear is performing at its peak. At MusicNomad, we believe that with the right tools and a repeatable process, changing strings should be a fun deep dive into your instrument, not a neglected chore.
This guide provides a professional roadmap to making your next string change fast, safe, and successful. This guide will walk you through the essential steps for changing strings on an acoustic and electric guitar. All tips presented can be used on any fretted instrument like bass, ukulele, mandolin, banjo, and more.
Section One: Why and When to Change Strings
Why Do I Actually Need To Change My Strings?
No matter if you play a little or everyday, your strings will eventually wear out and need to be replaced. Strings wear out from playing but also the environment around them also causes them to oxidize and lose their tone even when they are in a case of hanging on the wall. .
Tone Loss: Over time, playing causes strings to lose their elasticity and accumulate dirt and oil from your hands, resulting in a “dead” or “muddy” sound. Bending and fretting the string over and over will cause the strings to lose their elasticity, brightness, and sustain when played.
Structural Wear: After many hours of playing, physical “divots” form on the underside of the strings where they hit the frets, causing buzzing and intonation issues. You can see and feel these divots by running your finger along the underside of the string. This damage will also make the string have less sustain.
Corrosion: Sweat from your hands and humidity in the air causes oxidation or rust, which feels rough on the fingers and can accelerate fret wear. You’ll see a black build up on the windings and even on the unwound strings. This corrosion can feel sticky and makes playing slower.
When Is It Time For A String Change? How Can I Visually See There Is An Issue?
If you feel that the strings are playing slowly, look tarnished, or don’t sound as bright and full, there are a few steps to take when deciding if you need to put on a new set.
The Sight Test: Look for a dark tarnish on the strings: discoloration, dark spots, or visible rust. This wear will be most visible around the first few frets near the nut where the most chords are played, and near the bridge when you rest your picking hand and palm mute.
The Cleaning Test: If your strings are tarnished you can clean them and bring them back to life. Use a microfiber cloth like 2 ‘n 1 Beyond Plush Players Cloth or Microfiber Suede Polishing Cloth to wipe the surface of the strings to remove excess dirt and grime.Then use a string cleaner like String Fuel to do a deep clean. If after cleaning your strings still sound dull or don’t return to pitch as well as they used to, it’s time to change your strings.
The Feel Test: When you are playing and if you run your finger along the top or bottom of the string and you pick up a black residue or tarnish, it’s time to clean your strings. Run your finger underneath the string; if it feels jagged or pitted, the windings and wire are damaged and it’s time to put on new strings.
The Sound Test: If your guitar won’t stay in tune as you play or sounds dull without sustain and brightness, your strings may have lost their elasticity and need to be changed.
How Often Should Guitar And Bass Strings Be Changed?
While it is different for every player, once you notice sound change or corrosion that can’t be cleaned (see The Complete Guide To Guitar And Bass String Cleaning And Care to learn how), it’s time to change your strings. It’s also good to remember that not all strings last as long as others:
Electric strings: Generally made of thinner wire, if you play every day, your strings may only last one week before they need to be replaced. If you play occasionally, they can last up to three months before needing attention or replacement. Replace them when cleaning no longer improves the sound or removes the corrosion.
Acoustic strings: Generally made of thicker wire, if you play every day, your strings may only last a month or two before they need attention. Acoustic guitar strings also tarnish and oxidize faster than electric guitar strings. Replace them when cleaning no longer improves the sound or removes the corrosion.
Bass strings: Bass strings are much thicker and require less frequent replacement, some players go for years without changing them. Replace them when cleaning no longer improves the sound or removes the corrosion.
Coated strings: The coating helps the strings last longer, but they need to be replaced when the coating is worn or the sound has changed. They can also be cleaned to extend their life.
If you have acidic sweat you may need to change them more frequently or use coated strings.
Can I Change Just One String If It Breaks, Or Do I Have To Change Them All?
While you can replace just one in a pinch, we highly recommend replacing the full set. A single new string will sound much brighter than the others and can create an unbalanced tone, especially when playing chords.
Section Two: Preparation & Essential Tools
Is It Hard To Change Guitar Strings?
No, string changes are actually quite simple once you find the method that works for you. New players are often anxious about breaking a string, scratching the finish, or changing the setup. The most important thing is to have a sturdy work space like a desk or kitchen table to keep your guitar safe while you are working. From there you can add the right tools for the job.
What Tools Do I Need To Change My Strings?
Once you’ve set up your workspace, gathering a few essential tools will allow you to change strings efficiently without risking damage to the finish or hardware. Here are the essentials that will cover any string change you will face:
Finish Protection: A Premium Work Station Neck Support and Work Mat to protect the guitar body from scratches and stabilize the neck. The Cradle Cube helps keep the neck and body from moving while you remove and replace strings. The Work Mat protects the finish and turns any surface into a safe place for guitar maintenance.
String Winder: Essential for removing and replacing strings fast. A winder will also wrap the strings on the post more uniformly, keeping the guitar in tune better. Our GRIP Winder has a special scratch-free rubber lined design to protect the hardware, plus the dual bearing construction tunes up or down fast.
String Cutter: Cutting off the string at the tuning peg post will prevent scratches to the peghead. Regular wire cutters can mangle strings and are too bulky to get in close enough to cut the string and not scratch the peghead. Our GRIP Cutter has a special blade to slice through even thick bass strings and a special shape to cut the string right at the post.
Bridge Pin Puller: Acoustic guitar bridge pins can be very hard to remove unless you have a dedicated puller. Using pliers can easily damage the pin and the bridge. Our GRIP Puller is metal free and lets you apply gentle pressure to remove stubborn pins safely.
While you can easily experiment with new strings, if you’ve dialed in your setup, tone, and playability, it’s best to replace your strings with the same gauge and brand. Even the same gauges from different string manufacturers will play and sound different. Here’s a few things to keep in mind when shopping for strings:
Check with the guitar manufacturer: If you like how the guitar played from the store, contact the manufacturer for the factory spec gauge. This is often listed on the website.
Save the pack: Always tear off the front of your string pack and keep it in your case for future reference.
Measure: You can also use a set of calipers to measure the size of the strings while they are installed on the instrument.
What Are The Most Common String Gauges?
While factory-installed strings can vary between instrument makers, the most common gauges are:
Acoustic: Typically, “Light” (.012–.053) or “Custom Light.” (.011-.052).
Electric: Typically “Regular Slinky/Light” (.010–.046) or “Super Light/Slinky” (.009–.042).
Bass: Typically “Medium” (.045–.105).
Always check the individual string gauges listed on the pack, as different string manufacturers use similar names for different gauges compared to other manufacturers.
Section Three: The String Changing Process
Do I Take All Of The Strings Off At Once Or Should I Change Them 1 By 1?
Both methods are perfectly fine depending on your bridge type and what other maintenance you need to do. Here’s when to use each method:
1 by 1: This method keeps constant tension on the neck; ideal for quick changes. On guitars with “floating” bridges (like Floyd Rose) or unglued archtop guitar and mandolin bridges, changing one by one is almost mandatory to maintain balance.
All at once: Removing all the strings at once won’t hurt your guitar, but it will cause the tension on the neck to change, changing the action while the guitar adjusts to new strings. This method is best when it’s time to deep-clean your fingerboard and polish your frets (see our Fretboard Cleaning And Care Guide to learn how).
On guitars with “floating” bridges (like Floyd Rose) you’ll need to block the trem with a block of wood behind the tremolo block or a fabric wrapped ruler under the bridge to keep it from diving backward. On unglued archtop guitar and mandolin bridges, you can use a piece of low-tack tape to mark the location of the bridge and remove it to do a deep cleaning.
How Do I Clean My Strings?
Before tuning up, it’s a good habit to give your strings a clean before and after practicing or a gig. Cleaning your strings before you play will not only make them feel and sound better, they will play faster too.
Use a string cleaner, like String Fuel to do a deep clean. Rub the applicator over the strings to remove the dirt and oxidation. String Fuel’s special formula not only removes the dirt, it rejuvenates and lubricates the string for a faster feel with less finger noise and squeak as you play
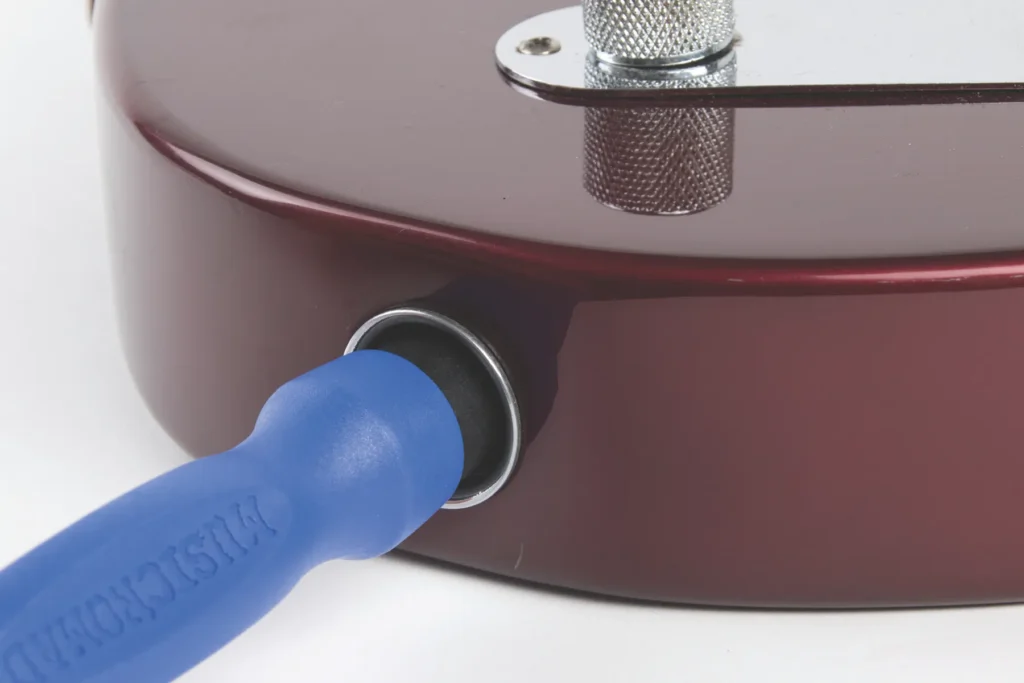
Without the right tools, it’s very easy to damage the pin and the bridge when trying to remove a stubborn bridge pin. Never use pliers which can easily cause damage. Use a dedicated tool like the GRIP Puller or the puller built into the GRIP ONE to prevent damage.
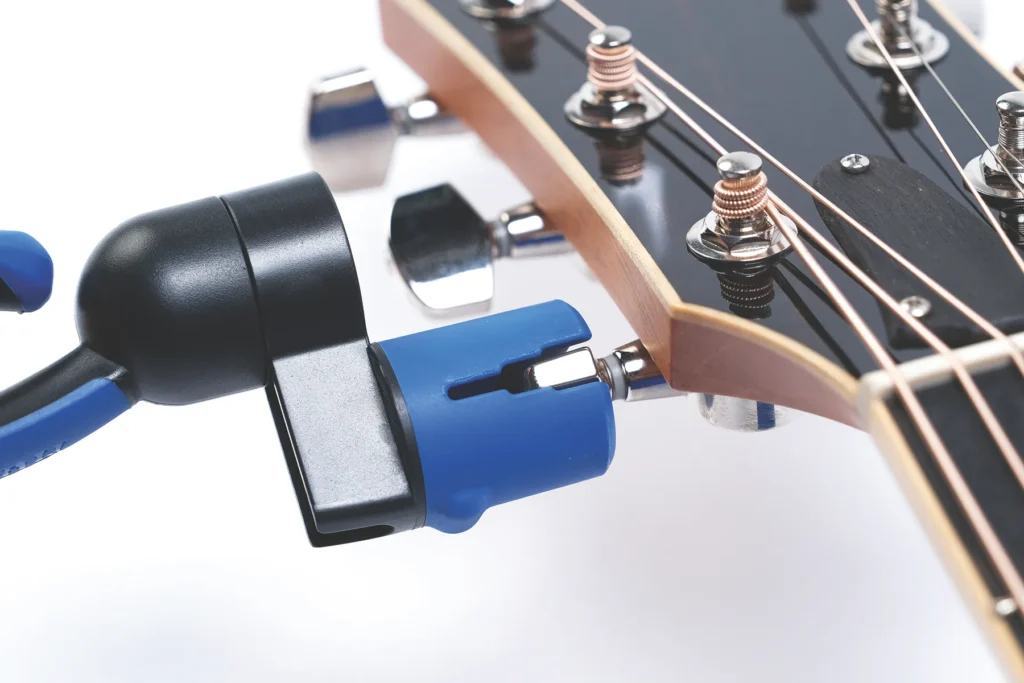
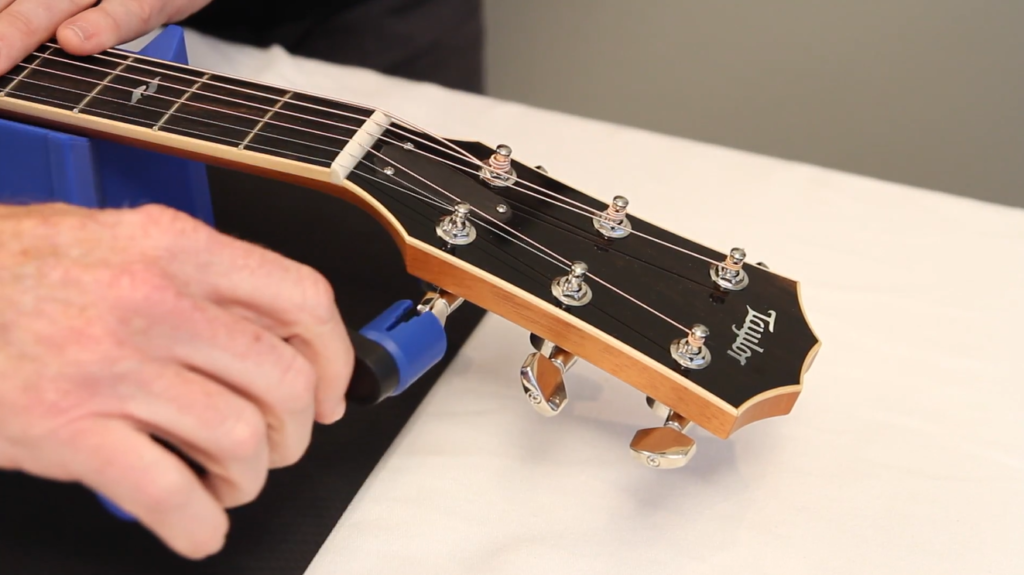
Loosen the string to remove the tension. A string winder like the GRIP Winder makes this fast and won’t scratch your tuners.
Using a pin puller like the GRIP Puller or GRIP ONE, make sure the puller is contacting the neck of the pin under its head completely.
Gently pull straight up on the pin. If the pin is stuck or won’t move easily, you can gently rock the pin (the GRIP Puller’s shape makes this easy) to free the pin. If the pin is stuck, you can reach in the sound hole and use a coin to gently push up on the pin from below the bridge to remove it.
Using MusicNomad GRIP Puller to safely remove acoustic guitar bridge pin
Can I Use An Electric Drill To Change My Strings Fast?
Yes. If you have a lot of guitars, the GRIP Bit attaches to any power drill or screwdriver to make winding and unwinding nearly instantaneous. Use the drill on the lowest/slowest setting to change strings safely and not damage your tuners. It’s very easy to snap a brand new string if the drill is set too high.
What Is The Best And Safest Way Or Method To Change My Strings?
Designed alongside top guitar techs, the MusicNomad FLOW method breaks down all of the steps to help players not only change their strings but also give their guitar a thorough tune-up.
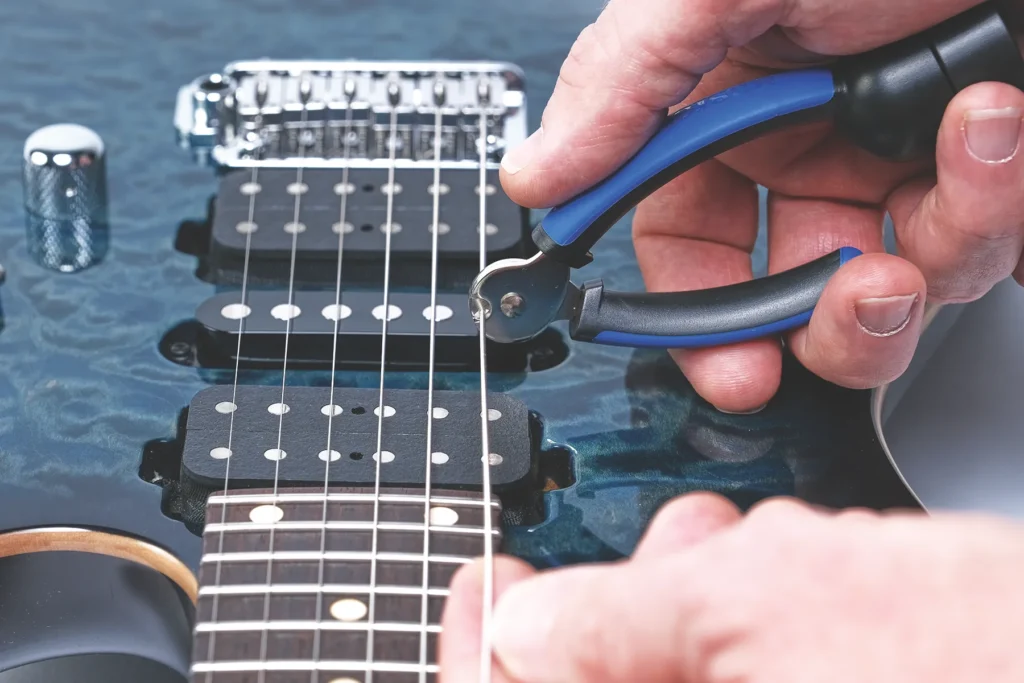
1. Remove strings: Loosen each string using the GRIP Winder to remove all tension. Once slack, use the GRIP Cutter to snip the strings. If you are removing all the strings, it’s a good time to clean the body, frets, and fretboard. Check out The Complete Guide to Cleaning Everything on an Acoustic Guitar for full details. These tips will also help you safely clean electric guitars, basses, or any fretted instrument.
Using MusicNomad GRIP Cutter to cut guitar strings
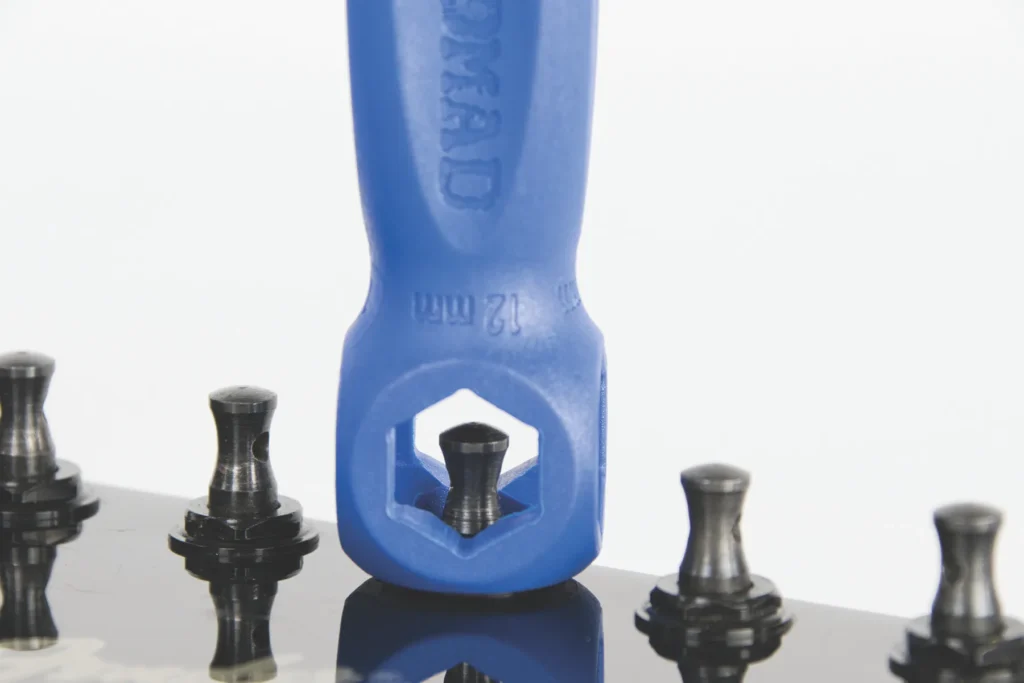
2. Tighten all tuning bushings: Repair shops found that 70% of guitars have loose bushings, causing buzz, sustain loss, or tuning issues. This can be caused by temperature/humidity change and vibration. Do not over tighten, snug or finger tight is the right amount. 10mm is the most common size, use The Octopus 8 ’n 1 Tech Tool to tighten without scratching. The Octopus has five different sizes to fit the most common bushings used on USA-made and imported guitars.
Be careful not to over tighten.
3. Tighten String Guide: Many guitars (especially Fender Strats and Teles) use string guides to help keep the string at the proper angle over the nut. String guides or “string trees” loosen over time and can result in string buzz or tuning instability. Use The Octopus 8 ’n 1 Tech Tool to snug these up, making sure you do not over tighten.
String Guides loosen over time and can result in string buzz.
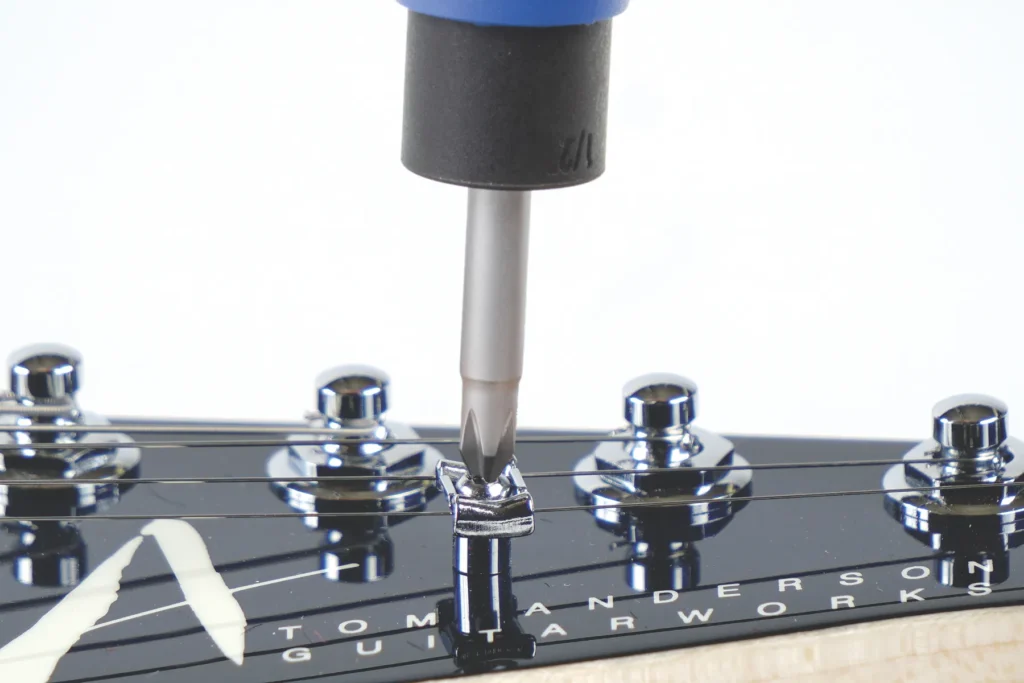
4. Tighten Output Jack/Pots: Output jacks loosen over time as your guitar cable goes in and out constantly. Use The Octopus 8 ’n 1 Tech Tool and do not over tighten. Caution: for loose jacks that need to be tightened more than one half a turn, stop tightening as you may twist the internal wires and break the solder joints. Contact tech@musicnomad.com for advice.
MusicNomad's Octopus 8 'n 1 Tech Tool tightening an output jack.
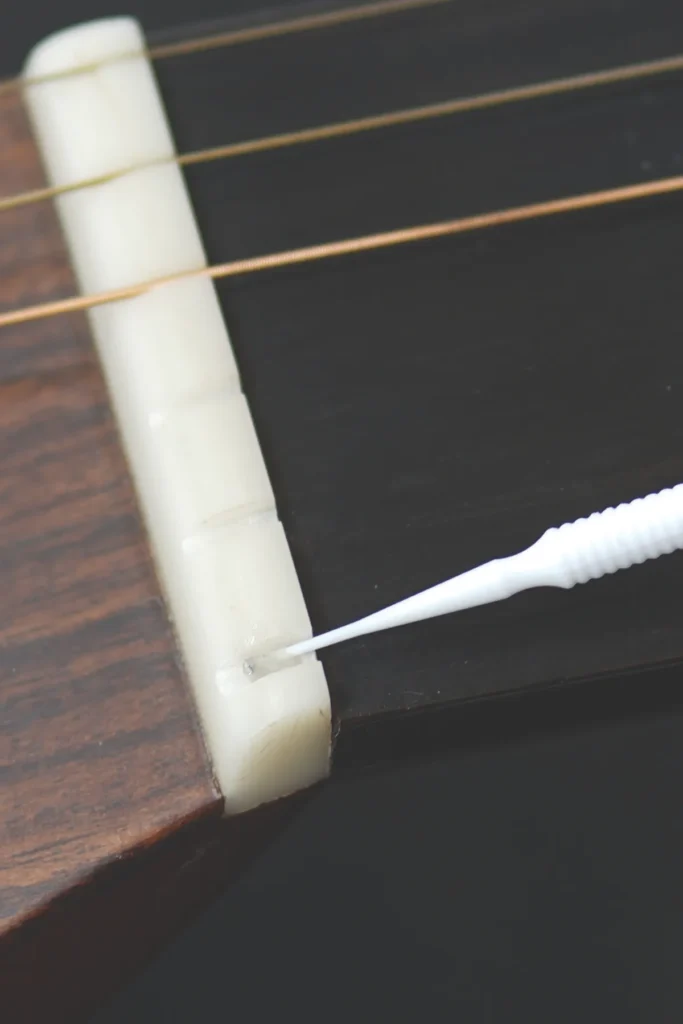
5. Lubricate String Touch Points: Without lubrication on touchpoints like nut and saddle slots, friction, binding and wear occurs, resulting in tuning issues, “ping” sounds and increases the chance of string breakage. Using TUNE-IT – String Instrument Lubricant on your slots, bridge/saddle and string guide every string change is the proven solution. Add just a dab to all the points where the string touches the saddle and nut.
Using MusicNomad's TUNE-IT to lubricate slots
6. Wind Strings On: Feed the string through the tuner post hole and gently wind 2-4 wraps around the tuner post. Our narrow profile GRIP Winder head that is rubber lined ensures a scratch free and clank free experience every time. The innovative bearing design allows for effortless, silent, and super-fast tuning.
Winding strings on with MusicNomad's GRIP Winder
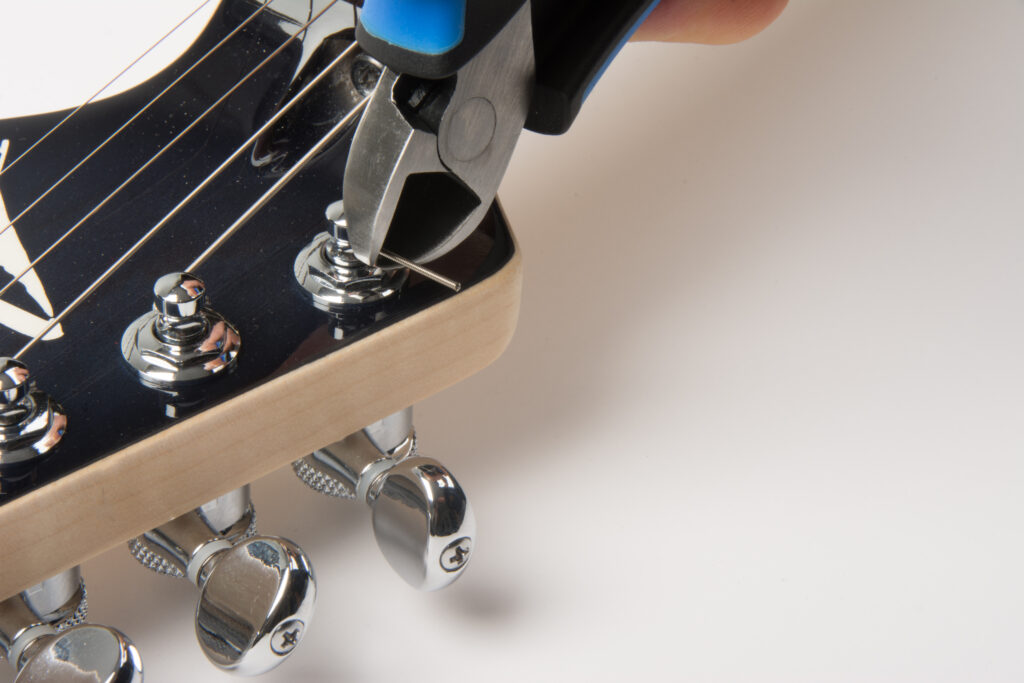
7. Cut Excess Strings: Get in close to the tuning peg post with the GRIP Cutter or GRIP ONE and cut off the excess string. The excess string can scratch the finish on the headstock and also catch and tear the inside of a case or gig bag.
Using MusicNomad GRIP Cutter to trim excess guitar string at tuning peg
8. Tune in Playing Position: With your guitar in the playing position, tune up each string to pitch by hand. Now your guitar is strung up like the top repair shops do it. This helps keep the gravity the same on the neck and keeps the guitar in tune and intonated more accurately when playing.
Is There A Specific "Wrap" Technique For The Tuner?
Aim for 2–4 neat wraps down the tuning post for most guitars. This provides the correct break angle over the nut, ensuring better sustain and fewer buzzes. Thicker wound strings usually use two wraps while thinner unwound strings use 3-4 wraps.
If you have locking tuners, use the least amount of the string around the post as possible. The lock holds the string in place, using less string around the post will help keep the guitar in tune when bending strings or using a tremolo or vibrato unit.
For bass strings with tapered ends: Ensure only the “silk” or the tapered part of the string wraps around the tuning post, as winding the full thickness of a heavy-gauge bass string around a post can cause it to snap.
How Do I Change Strings On An Acoustic Guitar With Bridge Pins?
Most acoustic guitars use bridge pins to wedge the string ball-end against the bridge plate inside the guitar. This can be tricky to change the first time, but these steps will make it easy and damage-free. Combine these steps with the FLOW method to make acoustic string changes easy.
Loosen and Snip the Strings: Use your GRIP Winder to remove all tension. Once slack, use the GRIP Cutter to snip the strings about an inch from the bridge pin. Be careful: it is possible that the short piece of the string with the ball on it can fall into the sound hole when the pin is being pulled.
Pull the Pins: Use the GRIP Puller or the puller built into the GRIP ONE, to lift the pins straight up. Avoid prying against the wooden bridge, which can leave permanent dents.
Pre-Bend the Strings: Before inserting the new string, put a half round bend in the wire about half an inch above the ball end. This will help it seat better under the bridge plate.
Seat the Ball: Insert the ball end and the pin into the hole. Seat the ball end against the inside bottom of the bridge plate. Insert the pin with the slot facing the headstock. The string should travel from the ball end against the bridge plate, through the slot in the pin, and over the bridge saddle. Pro Tip: If the pin “jumps” out while you are tuning up or you hear a loud “clack”, the ball end is sitting on the bottom of the pin rather than against the bridge plate. Push it back down and reseat it. When the string is not seated properly the winds can damage the plate, the bridge holes, and the pins.
Lubricate String Touch Points: Without lubrication on touchpoints, friction, binding and wear occurs, resulting in tuning issues, “ping” sounds and increases the chance of string breakage. Use TUNE-IT – String Instrument Lubricant on your nut slots to reduce friction and keep the guitar in tune.
Thread and Wind: Run the string to the headstock, putting 2-4 winds around the post.
Loosen the strings using MusicNomad's GRIP Winder to remove all tension.
How Do I Change Strings On Electric Guitars?
Electric guitar bridges vary wildly, but most follow similar processes for changing strings. Combine these steps with the FLOW method to make electric string changes easy.
Standard Gibson-style Stopbar Tailpieces
Thread through the tailpiece: Feed the strings through the back (strap button side) of the stop tailpiece and over the saddles of the tune-o-matic or similar bridge. If you have a single wraparound style bridge, feed the strings through the front (pickup side) of the bridge and wrap them over the top (toward the nut).
Top wrap option: Some players wrap the strings over the top of the stop tailpiece for a slinkier feel, though through-the-back is standard.
Protect the finish: Be careful—the metal ball end or sharp metal string end can easily scratch the top of the guitar as you pull it through. Use a cloth around the bridge to protect the finish.
Non-Tremolo Fender Tele-style Hardtails
Thread through the bridge: Feed the strings through metal ferrules on the back of the guitar body or through the back of the bridge, depending on the type of bridge.
Check the saddle: Ensure the string sits perfectly in the notch or center of the bridge saddle. If it’s off-center, your intonation and action will feel wrong and tuning and intonation will be off.
Fender Strat-style Tremolo/Vibrato Bridges
Maintain tension: If you take all strings off at once, the bridge will “sink” into the body. Change one string at a time unless you need to clean the frets or fretboard.
Block the trem: Place a small stack of post-it notes or a soft cloth under the back of the bridge to keep it level while you change strings. This will help keep your setup dialed in as you change the strings.
Feed strings through the block: Feed the strings through the tremolo block on the back of the guitar.
Bigsby-style Vibrato Bridges
Maintain Tension: If you take all strings off at once, the unit’s spring can become loose and flip backward. Change one string at a time unless you need to clean the frets or fretboard.
Block the trem: Place a small piece of foam or a soft cloth under the front of the vibrato to keep it level while you change strings.
Pre-bend the strings: About a half inch above the ball end, put a round bend into the string. This will allow it to hold in place as you attach it to the string posts.
Attach the string to the string posts: Strings are hooked onto the string posts by the ball end and wrap around toward the nut. If the vibrato has a tension bar the strings go underneath the tension bar before going over top of the bridge.
With all bridges, lubricate the string touch points. Without lubrication on touchpoints, friction, binding, and wear occurs, resulting in tuning issues, “ping” sounds and increases the chance of string breakage. Use TUNE-IT – String Instrument Lubricant on your nut and saddle slots and pivot points to reduce friction and keep the guitar in tune.
Note: Double locking bridges: These bridges have a more elaborate setup and can vary widely. Look for the manufacturer’s instructions for the proper way to restring. It can be very similar to a Strat-style bridge but may have different steps depending on the manufacturer. Common manufacturers are Floyd Rose, Ibanez, Schaller, Wilkinson, and others.
How Do I Change Strings On A Bass?
Bass strings are much thicker and require more force to seat the string properly.
Top-Loading: Many of these types of bass bridges allow you to simply insert the ball end into a slot at the back of the bridge. Make sure the ball end of the string is fully seated into the channel. This is common on vintage-style Fender Jazz and Precision Basses and Ernie Ball Music Man basses.
Through Body: Feed the strings through the metal ferrules on the back of the bass body or through the back of the bridge, depending on the type of bridge. This is common on modern Fender Basses and many other builders.
Seat the strings: Because bass strings are so thick, they don’t bend readily and stay in the nut or saddle slot. Once the string is through the bridge, use your thumb to push the string down onto the saddle and nut to fully seat them into both slots. This makes sure they are aligned and stretch out faster.
Tapered Ends: Ensure only the “silk” or the tapered part of the string wraps around the tuning post; winding the full thickness of a heavy-gauge bass string around a post can cause it to snap.
Section Four: Tuning & Maintenance
Should I Stretch My New Strings?
Yes. New strings have slack in the windings at the tuner and bridge. If you don’t stretch them, the guitar will go flat every few minutes until they are stretched. Gently tug the string away from the body at several points, retune, and repeat until the pitch holds steady.
What If My Tuning Pegs Or Jacks Are Loose?
While the strings are off, use The Octopus 8 ’n 1 Tech Tool to snug up the hex nuts on your tuning machines and the input jack. Caution: for loose jacks that need to be tightened more than one half a turn, stop tightening as you may twist the internal wires and break the solder joints. Contact tech@musicnomad.com for advice.
How Do I Increase The Life And Performance Of My Guitar Strings?
Cleaning your strings before and after you play will dramatically improve their life and performance. One simple way to extend string life is washing your hands before playing. This helps remove excess oils and dirt that will be transferred to your strings. However, washing your hands alone does not stop the acidity and oils from building up on your strings—but cleaning your strings will.
Cleaning new strings will also help remove any dirt from the manufacturing process. Many fresh strings can turn your fingers black as you remove the grime from the factory. Using String Fuel on your new string will remove the dirt and protect your strings from the first strum.
It’s a good habit to give your strings a clean before and after practicing or a gig. Cleaning your strings before you play will not only make them play and sound better, they will play faster too.
Use a string cleaner, like String Fuel to do a deep clean. Rub the applicator over the strings to remove the dirt and oxidation. String Fuel’s special formula not only removes the dirt, it rejuvenates and lubricates the string for a faster feel with less finger noise and squeak as you play.
Section Five: Common Misconceptions
Should I wait until a string breaks to change the set?
Waiting until a string breaks means you’re playing on degraded, dirty strings that sound poor and can actually cause dirt and grime to build up on your frets. If cleaning no longer brings your strings back to life, or they are dull sounding and the windings are damaged, it’s time to replace the set.
Does boiling strings make them new again?
This is an old-school bass player trick. While boiling removes some dirt and oil, it doesn’t fix the physical “divots” or structural fatigue of the metal string. It is a short term fix at best. You’ll get a better clean with a dedicated cleaner like String Fuel you can use while the strings are on the instrument.
Will any hardware store wire cutters work to cut my strings?
Hardware store wire cutters are often bulky and can easily slip and scratch the headstock finish. A high-quality, side-flush cutter like our GRIP Cutter has a special blade to slice through even thick bass strings and a special shape to cut the string right at the post.
Will changing string gauges affect my setup or guitar?
Usually changing up or down one gauge will require a minimal adjustment. More extreme gauge changes will require a setup. If you move from very light strings to very heavy strings, the increased tension will likely require a truss rod adjustment and a full setup. While it can seem daunting, The Complete Guide to Guitar Neck Relief shows you all the steps you need to know to properly evaluate and adjust your truss rod.
If you do need to do a full setup, our Setup Hub has tips, videos, and detailed steps to help you adjust your action, set your intonation, and get your guitar playing better than ever. Our Keep It Simple Setup (KISS) System takes all of the mystery and guesswork out of making your guitar play great.
Section Six: Tips and Tricks
What Are Tips To Help Make String Changing Easier?
The more times you change strings, you’ll learn what method works for you, as well as each individual guitar. Here are a few of our favorite tips that we’ve developed over countless years and thousands of string changes.
Cut the strings at the tuners and saddles when removing: Cutting the string at both locations after loosening the tension will let you remove the string from the bridge and tuners much faster and with more control than leaving the string long.
Keep tension on the string then winding: When winding the string up keep the tension tight to make sure the wraps go on the tuning post more smoothly. This will allow the strings to stay in tune faster.
Tug on the excess string at the tuning post before cutting: Tugging on this excess string will help get the string in tune faster and require less stretching.
Bring each string to pitch as you install it: Gradually increasing tension prevents sudden stress on the neck, allowing the instrument to stabilize more quickly. After adding a new string, briefly re-adjust the ones already installed to tune-up the entire guitar faster.
Cover the headstock with a cloth when cutting excess string length: Use the 2 ‘n 1 Beyond Plush Players Cloth or Microfiber Suede Polishing Cloth to shield the headstock and prevent dings and scratches.This also prevents small pieces of the metal string from hitting the finish and scratching it.
Keep the string out of nut and saddle slots until the string is close to pitch: Wait until a string is nearly at pitch before seating it in the nut and saddle slots. Because strings can act like a saw or sandpaper, bringing them to tension while they are in the slots creates unnecessary friction. By holding the string slightly elevated until it is tight, you prevent this premature wear.

")
")
")
")
")
")
")
")

")
")

")