
The Complete Guide to Fixing Fret Sprout for Guitar and Bass
If you’ve ever picked up your guitar and felt those sharp, protruding fret ends digging into your hand, your guitar is suffering from fret sprout. Not only does it make the guitar uncomfortable to play, bad cases can even cut you. Fret sprout is actually very common and almost every guitar will experience it over time. Fortunately, with the right tools, you can easily eliminate those sharp ends and get playing again. While this guide will focus on fixing fret sprout on guitars, these tips and techniques apply to any fretted instrument like bass, mandolin, banjo, and more.
What Is Fret Sprout?
Players and techs use the term ‘fret sprout’ to describe when the ends of a fret pokes out past the sides of the fingerboard, “sprouting” like a plant out of the ground.This exposed metal, often sharp, makes playing uncomfortable or painful. The metal protruding out can be the fret end, the fret tang (the bottom part of the fret that is seated within the wood), or a combination of both.
How Do I Know If My Guitar Has Fret Sprout?
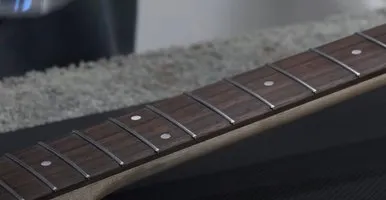
There are a few simple ways to check if your guitar has fret sprout. Run your finger along the edge of the fretboard. If you feel slight bumps at the ends of the frets, you have a slight case of fret sprout. If you feel the metal of the fret poking out sharply, you have a much more serious case. You can also use a wooden dowel to run along the side of the fingerboard. If the dowel skips or gets caught, this also indicates fret sprout. In some more extreme cases you will be able to see the frets poking out, not just feel them.
If your guitar has finish over the sides of the fretboard, a light circle of finish popping up around the fret ends indicates fret sprout. On a bound neck you’ll feel small bumps at the ends of the frets through the binding, and you may also see small cracks in the binding at the ends of the frets as well.
What Causes Fret Sprout?
Fret sprout is caused by the fretboard wood shrinking due to lack of moisture and low humidity. Because the wood shrinks and the metal frets do not, the ends of the frets are left exposed, causing them to feel sharp along the edge of the fretboard. Low humidity is common in winter months when your heater is on or when running an air conditioner during summer.
Fretboard care is very important and we’ve written a Fretboard Cleaning and Care Guide with more details on how to replenish the natural oils in your fretboard and keep it from drying out.
Does Fret Sprout Affect Playability?
Yes. Fret sprout can make your guitar uncomfortable to play, causing irritation or even cuts to your fretting hand in severe cases. It also causes you to play with less fluidity as you’ll feel unevenness on the side of the fretboard as you play.
What Tools Do I Need To Fix Fret Sprout?
- Fret Beveling File: A specialty metal cutting file is needed to level the exposed tangs and fret ends. While you can use a regular fine-cut file for this job, keeping the file at a consistent angle while moving along the fretboard is very difficult. It’s also easy to slip off the fret ends and accidentally scuff the tops of your frets. We recommend our Fret Beveling File (B-File) which includes a handle to keep the file at the correct angle. The handle also stays centered across the fretboard to give you stability when filing. It has two positions: one for leveling frets flush and one for beveling the fret ends.
- Fret End Dressing File: Beveling the fret ends will leave a sharp corner where the crown of the fret meets the bevel, which you need to round over to give the fret end a smooth, comfortable feeling. A very precise, thin file is needed to dress (or shape) the ends of the fret after you file them flush. Our Diamond Coated Fret End Dressing File (E-File) was specially designed for this delicate job. It has two sides: one is flat to smooth the sharp corners of the fret close to the fingerboard, the round side will help you round over the beveled fret crown without marring or scratching the fretboard.
- Sandpaper/Polishing Papers And A Sanding Block: After dressing the fret ends with a file, they’ll need to be polished to feel smooth and play effortlessly. Using a sanding block will help keep your sandpaper at the same consistent angle as you polish. The Tracers Fret Finishing Kit has the fine grits of Micro-Mesh you need to quickly polish out the filing marks. The set also includes a block with a hard side to polish the fret bevels and a soft side to polish the fret corners.
- Tape (optional): some techs use protective tape to help prevent scratching the finish when filing. This is a good practice when you are first getting comfortable using a file, but the tape will also prevent you from getting the fret ends perfectly flush to the fretboard. If you have a lot of fret sprout to remove, it’s a good practice to protect the neck with tape as you get started, then remove it once you are close to filing the frets flush.
-

Diamond Coated Fret End Dressing File (E-File)
MN830$29.99 -
")
Fret Beveling File (B-File)
MN831$39.99Rated 5.00 out of 5(1) -
")
6 pc. Tracers Fret Finishing Kit
MN860$34.99Rated 5.00 out of 5(1)
Do I Need To Bevel My Fret Ends?
Yes. Beveling the fret ends makes the guitar neck more ergonomic and faster to play, especially when using chords and moving up and down the neck. Without the bevel, the fret ends can dig into your hands, making your guitar uncomfortable to play.
What Angle Should I Bevel My Frets?
How Do I Fix Fret Sprout?
- File the fret ends flush with the fretboard: use a file like our Fret Beveling File (B-File) to level the fret tangs and ends flush with the fretboard. Filing at 3° better matches the rounded side of most fretboards than a file held flat.
- Bevel the fret ends: use a file like our Fret Beveling File (B-File) to bevel the fret ends to be more comfortable to play. We’ve found that 23° is ideal for most playing styles with the perfect balance between comfort and playability.
- Dress the corners of the frets: Use a file to smooth over the sharp corners of the fret created by beveling. File the corners where the sides of the fret meet the bevel at the surface of the fretboard. Our Diamond Coated Fret End Dressing File (E-File) has a flat side to get in close to the fingerboard’s surface without scratching the wood.
- Dress the ends of the frets: Use a file to round over the sharp corner where the crown of the fret meets the bevel. Our Diamond Coated Fret End Dressing File (E-File) has a round side that will help you round over the beveled fret crown without marring or scratching the fretboard.
- Polish the fret ends: use a sanding block and high grit sandpaper to remove the file marks and polish the fret corners and fret end bevels. The Tracers Fret Finishing Kit has the fine grits of Micro-Mesh you need to quickly polish out the filing marks. The set also includes a block with a hard side to polish the fret bevels and a soft side to polish the fret corners.
What Specific Finish And Fretboard Construction Details Should I Pay Attention To When Fixing Fret Sprout?
- Exposed fret tangs: When the tangs, not just the fret ends are exposed, there is a higher chance to scuff the finish. To avoid hitting more of the surrounding finish than is necessary, make sure you are only using enough of the exposed file to trim the tangs and nothing more. The Fret Beveling File (B-File) has a channel in the handle so the file can be adjusted to the proper height to minimize finish scuffing.
- Finish covering the fret ends: Many necks, particularly maple Fender and gloss-finished models, have finish over the fretboard edges. When fret sprout occurs on these necks, the finish often lifts, creating a light circle of clear finish around the fret ends. In this case it’s very easy to accidentally chip and damage the finish when filing. If you see this “popping” effect, it’s best to take the guitar to a qualified luthier or tech. They can determine the best solution to fix the fret sprout and repair the finish.

- Putty in the fret end slots: Some manufacturers, such as Ernie Ball Music Man, undercut fret tangs prior to installation and then fill the space with wood putty or filler. While this prevents the tang from sticking out when the fretboard shrinks, the putty can be pushed out. In these instances, carefully file away the excess putty, applying less pressure with the file as the putty is much softer than the metal of the fret.

Bound fretboard: On bound fretboards where the sides of the fingerboard have plastic binding glued to the sides, the fretboard can still shrink and experience fret sprout. In this case you’ll feel a slight bump at the fret ends under the binding. In some cases you may also see cracks in the binding at the fret ends.
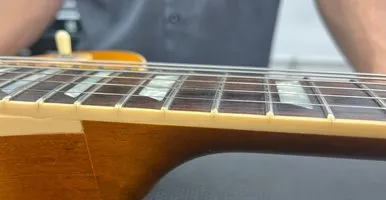
Fret sprout is not fixable for most bound necks, as you would need to file the finish and binding, which would leave the sides of the fretboard uneven and discolored. Luckily, bound fretboards experience fret sprout to a much lesser degree than unbound fretboards. Bound fingerboards are common on Gibson Les Pauls, SGs, ES-335s, and more.
What Happens If I Scuff My Finish When Filing Fret Sprout?
Will I Need To Fix Fret Sprout More Than Once?
In some cases, yes. As new guitars go through seasonal change, the fretboard will shrink and expand. If you fix fret sprout and your guitar goes through more extreme dry seasonal change, you may see the fret sprout return. Once your guitar has gone through a few seasons, you’ll find that the fret sprout no longer occurs. Older guitars that are exposed to more extreme seasonal changes can also experience fret sprout.